Transforming Plywood: Innovative Techniques for Dressing Up Your Wood Projects
When it comes to woodworking, plywood is often the unsung hero. Its versatility, strength, and cost-effectiveness make it a popular choice for a variety of projects, from furniture to cabinetry. However, raw plywood can sometimes lack the aesthetic appeal desired for high-end applications. This article delves into innovative techniques for dressing up plywood, enhancing its appearance while maintaining its structural integrity. Whether you're a seasoned woodworker or a DIY enthusiast, these methods will elevate your projects to a new level.
Understanding Plywood: The Basics
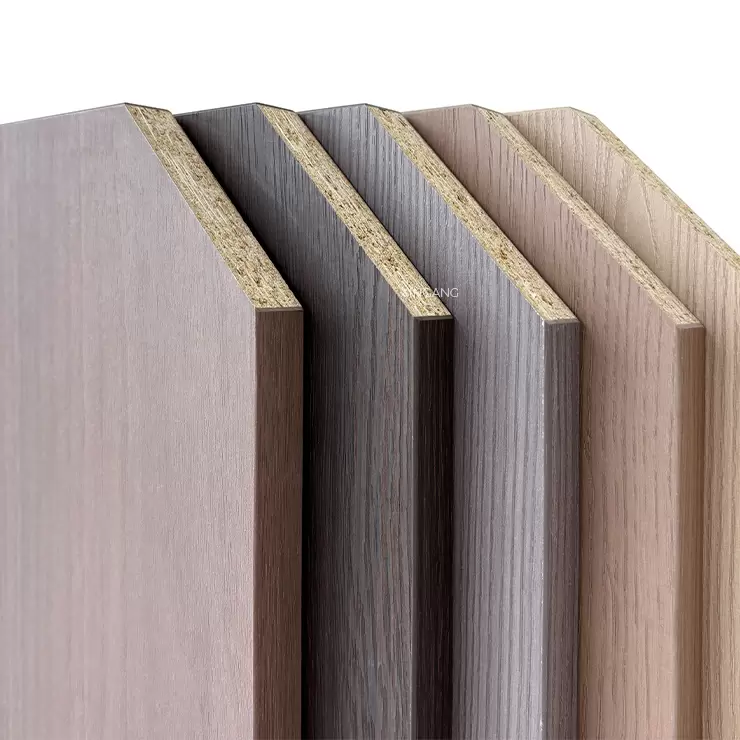
Before diving into dressing techniques, it's essential to understand what plywood is. Plywood is an engineered wood product made from thin layers of wood veneer, glued together with adjacent layers having their wood grain rotated up to 90 degrees. This cross-graining technique provides plywood with enhanced strength and stability, making it less prone to warping compared to solid wood.
- Veneering: The Art of Surface Enhancement
One of the most effective ways to dress up plywood is through veneering. This technique involves applying a thin layer of high-quality wood veneer over the plywood surface. Veneers come in various species, colors, and grain patterns, allowing for a wide range of aesthetic options.
Steps for Veneering:
- Select Your Veneer: Choose a veneer that complements your project. Consider factors like grain pattern, color, and thickness.
- Prepare the Surface: Sand the plywood surface to ensure it is smooth and free of dust. Use a fine-grit sandpaper for best results.
- Adhesive Application: Use a high-quality wood glue or contact cement to adhere the veneer to the plywood. Apply the adhesive evenly and allow it to become tacky before placing the veneer.
- Pressing: Use a veneer press or clamps to apply even pressure across the surface. This step is crucial for ensuring a strong bond.
- Trimming and Finishing: Once the adhesive has cured, trim the edges of the veneer and apply a finish of your choice, such as lacquer or oil, to enhance the wood's natural beauty.
- Painting and Staining: Adding Color and Depth
If you prefer a more modern look, painting or staining plywood can be an excellent option. This method allows for complete customization in terms of color and finish.
Painting Plywood:
- Preparation: Sand the plywood to create a smooth surface. Apply a primer to seal the wood and enhance paint adhesion.
- Choosing Paint: Use high-quality acrylic or latex paint for durability. Consider a matte, satin, or gloss finish based on your desired look.
- Application: Use a brush or roller for even coverage. Multiple thin coats are preferable to achieve a smooth finish.
Staining Plywood:
- Selecting Stain: Choose a stain that complements the natural grain of the plywood. Gel stains are particularly effective for plywood, as they provide even color without raising the grain.
- Application: Apply the stain with a clean cloth or brush, following the wood grain. Wipe off excess stain after a few minutes to achieve the desired depth of color.
- Edge Banding: A Polished Finish
Edge banding is a technique used to cover the exposed edges of plywood, providing a finished look and protecting the edges from damage. This is particularly important for projects where the edges will be visible, such as shelving or cabinetry.
Steps for Edge Banding:
- Select Edge Banding Material: Choose from a variety of materials, including wood veneer, PVC, or melamine, depending on your aesthetic and durability needs.
- Cut to Size: Measure and cut the edge banding to fit the edges of your plywood.
- Application: Use a hot iron or edge banding trimmer to adhere the banding to the plywood edges. Ensure that it is applied evenly and securely.
- Finishing Touches: Trim any excess banding and sand the edges for a seamless finish.
- Texturing and Carving: Adding Dimension
For those looking to make a bold statement, texturing or carving plywood can create unique visual effects. This technique involves using tools to create patterns or designs on the surface of the plywood.
Techniques:
- Router Techniques: Use a router with various bits to carve intricate designs or textures into the plywood surface.
- Burning: Wood burning tools can create stunning designs and textures, adding a rustic charm to your projects.
- Stenciling: Use stencils to apply patterns or designs, enhancing the visual interest of the plywood.
Conclusion: Elevate Your Plywood Projects
Dressing up plywood is not just about aesthetics; it's about transforming a functional material into a work of art. By employing techniques such as veneering, painting, edge banding, and texturing, you can create stunning pieces that showcase your craftsmanship and creativity. Whether you're building furniture, cabinetry, or decorative items, these methods will help you achieve a polished and professional look. Embrace the potential of plywood, and let your imagination guide you in dressing it up for your next project.